In this article, I'll show you how to leverage the full power of AI assistants in the design implementation process, using the duo of Cursor IDE and an MCP Server as an example.

Liya Vasilkova
Frontend Developer
Converting a design from Figma into code is an unavoidable stage of development, one that's often tedious and time-consuming. Even when we work with design systems where colors, fonts, and spacing are standardized, and layers and components are neatly named, transferring styles and double-checking every detail still eats up a lot of time and energy.
If you're still stuck in the copy-paste loop and are thoroughly tired of this routine - it's high time to look towards AI and the useful tools it can offer. In this article, I'll show you how to leverage the full power of AI assistants in the design implementation process, using the duo of Cursor IDE and an MCP Server as an example.
MCP (Model Context Protocol) is a tool that burst onto the scene in 2025 and quickly found its place in the AI tool ecosystem. Its emergence was a logical step in the evolution of AI agents, which outgrew the limited context of a single model.
MCP is an open-source standard that describes how AI agents and applications interact with each other and with external systems. Simply put, MCP acts as a language interpreter between products and Large Language Models (LLMs). It receives data in a specific service's "language" and translates it into a format the AI can understand.
In other words, MCP allows AI agents to expand their capabilities by gaining access to a broader context. Through MCP, an AI can safely fetch data via API, search for information, perform analytics based on external services, and complete other tasks beyond the base model's reach.
Companies like Figma can create their own MCP servers for their products by implementing this standard. Such a server knows how to call the product's API, extract the necessary context, and pass it to the agent in a structured way. In Figma's case, an MCP server directly integrates Figma into the workflow, providing AI agents with design information and the context needed to generate code based on Figma design files.
Integrating such a tool into your workflow isn't complicated. You'll need: a code editor with MCP support (VS Code, Cursor, Claude Code, Codex, etc.) and access to a Figma project.
Of course, there are nuances, such as design requirements, Figma's pricing plan, and other details. We'll discuss those a bit later.
What the Process Looks Like from a User's Perspective
In broad strokes, the workflow is like this:
I've tried different MCPs in practice; they are all functional options with their own quirks:
Let's take a closer look at the process using the official Figma MCP Server as an example.
First, log into Figma and open your design project.
Then, follow the installation instructions for the server in your IDE settings. It's genuinely simple and quick, taking just a couple of minutes. After installation and OAuth authorization, the server will show as 'enabled'.
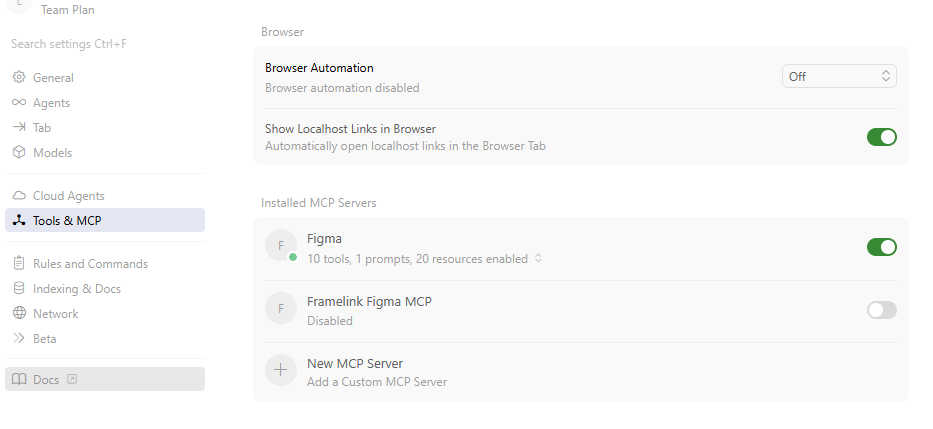
Now the editor (in my case is Cursor) has access to a ready MCP server.
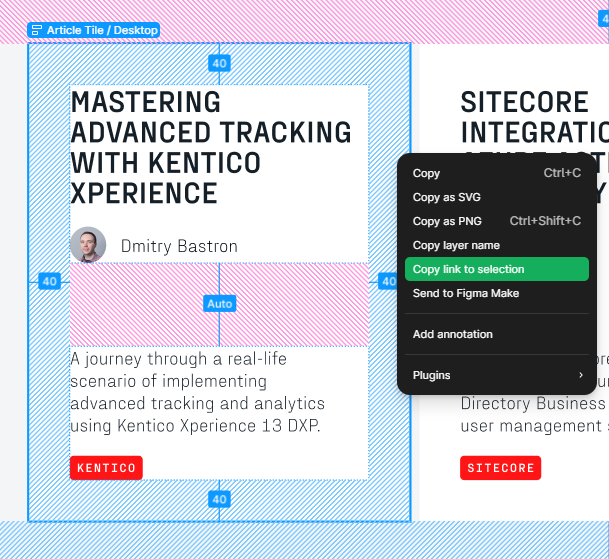
Select the desired component in the design and copy its link:
Write your prompt. It can be concise:
"Implement the component design from https://www.figma.com/design/<link-to-your-selection>"
Or more detailed (this makes the agent's job easier and reduces the number of operations):
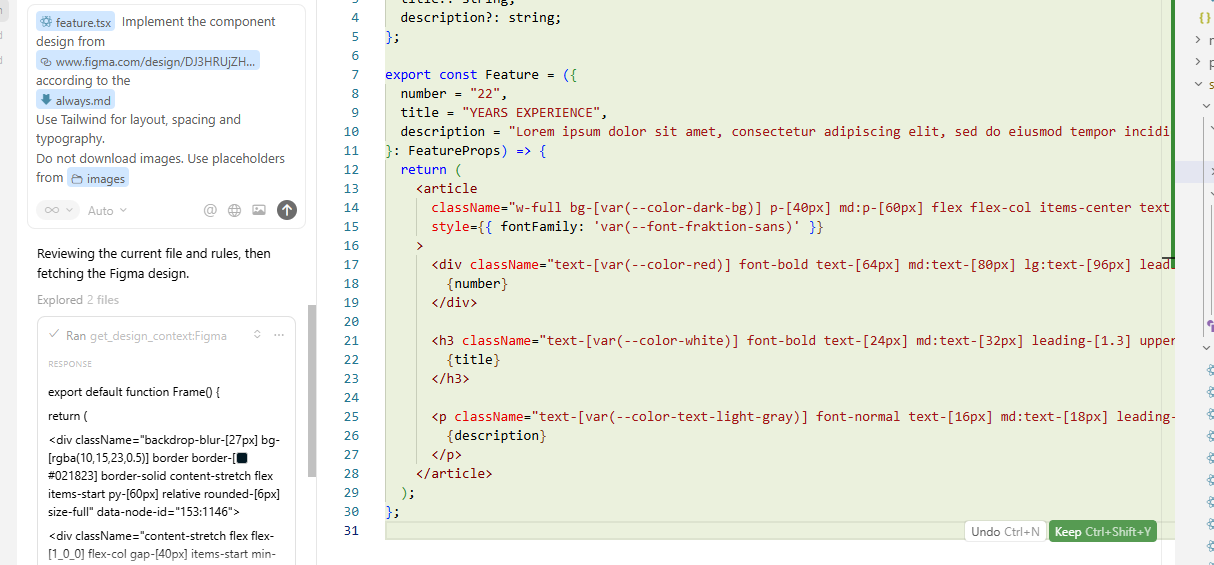
"@feature.tsx Implement the component design from https://www.figma.com/design/<link-to-your-selection> according to the @always.md. Use Tailwind for layout, spacing and typography. Do not download images. Use placeholders from @images"
Executing such a prompt is quite fast - from 20 seconds for small components (card, quote, hero block) to a couple of minutes for an entire page.
After that, the foundation is ready:
Then we ask the AI agent to adjust its approach:
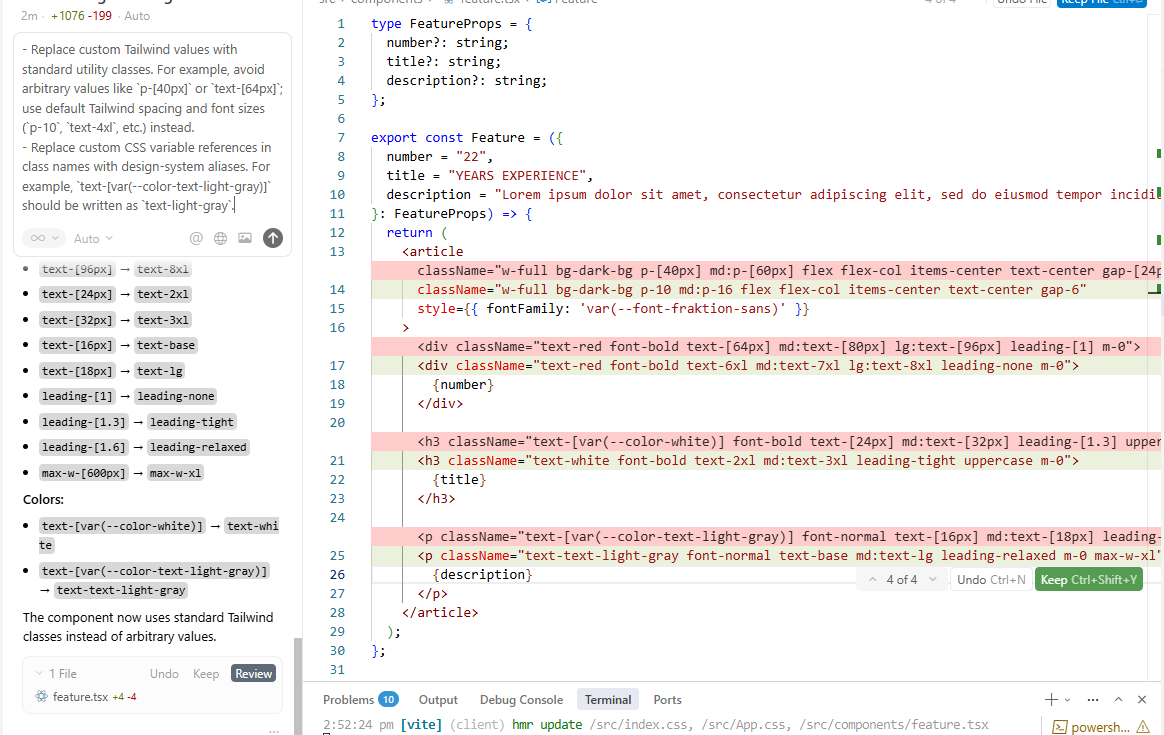
"- Replace custom Tailwind values with standard utility classes. For example, avoid arbitrary values like p-[40px] or text-[64px]; use default Tailwind spacing and font sizes (p-10, text-4xl, etc.) instead.- Replace custom CSS variable references in class names with design-system aliases. For example, text-[var(--color-text-light-gray)] should be written as text-light-gray."
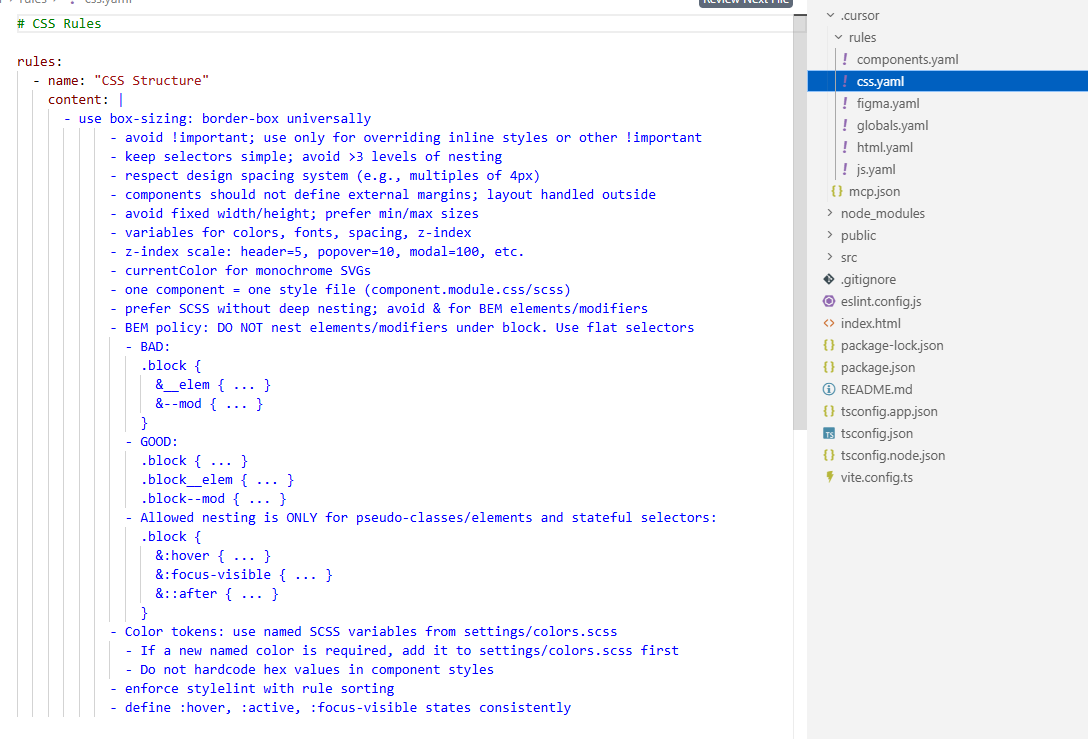
Depending on the AI model and the complexity of the design and the existing codebase, the AI can produce different results. So, you need to help the agent with context. This is where rules come in - you can create and expand them as you see fit. The documentation offers some tips on this.
The rules I used for a project with a React+Tailwind stack look like this:
# Cursor Project Rules & Guidelines
## Always Rules
## HTML / Accessibility (Component-Level Default)
- Use semantic tags (`section`, `article`, `nav`, `header`, `footer`) where relevant.
- Follow proper heading hierarchy inside components (don’t start with `<h1>` unless it’s a full page).
- Every image must have an `alt` attribute.
- Make interactive elements (buttons, links, menus) keyboard accessible.
## Code Generation & Architecture (JS/TS + React)
- Use **TypeScript** in strict mode; avoid `any`.
- Prefer **type** over `interface` (except for classes).
- Use **named exports only**; avoid default exports.
- Prefer **guard expressions** instead of nested conditions.
- Use **union types** instead of enums; `as const` objects are allowed.
## CSS / Styling (General)
- Use Tailwind for styling.
- Use a
**mobile-first** approach.
- Prefer flexible dimensions (`min/max-width`) over fixed ones
## Color & Design System
- Extract exact colors from Figma data; do not approximate.
- If brand colors or repeated colors appear for the first time, create CSS variables in src/index.css.
- Use exact hex or rgba values from Figma; do not approximate with Tailwind.
- Font families and other constants should be defined in src/index.css.
- Use Tailwind responsive breakpoints for layout.
## Images and icons
- Do not attempt to download images, use a placeholder from `src/assets/images/`.
- Always specify `alt`, `width`, and `height` attributes.
- Use descriptive `alt` text based on the component’s purpose or content.
## Development Workflow Optimization
- **Avoid redundant checks** - Don't check linter, existing configurations, or dependencies unless specifically requested
- **Skip obvious validations** - If package.json shows dependencies are installed, don't verify setup
- **Minimal todo lists** - Only create todos for complex multi-step tasks (3+ distinct steps)
- **Focus on core task** - Complete the main objective first, then add refinements if needed
- **Assume working environment** - Don't verify basic project setup unless errors occur
It's convenient to place the rules in a separate directory. For example, create a .cursor folder in the project root and put all rules inside a rules folder within it. Be sure to give the AI agent a link to the rules.
Here's also an example of a detailed set of rules from another project configured with Framelink MCP:
It's important to understand that the agent may selectively ignore formal rules. Sometimes, it makes sense to duplicate important requirements directly in the prompt. It doesn't hurt to add a reminder at the beginning of the dialogue like: "Respect all rules from .cursor/rules".
Another topic is the AI agent's analysis of existing styles and components. Even if the agent correctly navigates the project structure and understands current UI patterns, it doesn't guarantee the generated code will fully meet your requirements and expectations.
Here's a list of what positively affects the quality of the AI agent's output:
The fuller the context available to the AI agent, the more organically the design integration into code will proceed. Context includes not only rules and component examples but also basic project settings, existing files, styles, patterns, and any documentation that helps the agent correctly navigate the structure and development approaches.
You can expand the context not only with rules and component examples. I highly recommend checking out Figma's Code Connect feature. It's only available for Organization and Enterprise plans, but it links real components from your repository with components in Figma - this way, the agent sees not only the design structure but also the actual code, import paths, props, and usage examples. If the Figma project is a true design system, such a tool seems like a must-have for a team planning to use MCP.
I also want to mention the topic of responsive design separately. AI handles generating the necessary layout based on provided responsive designs quite well. Example prompt:
"@feature.tsx Implement the component design from Figma:
- Mobile: https://www.figma.com/design/<link-to-your-selection>
- Desktop: https://www.figma.com/design/<link-to-your-selection>
Ensure responsive design: switch to desktop layout at 1024px width."
Here are a couple of visual examples for a project with only the most minimal basic settings so far, and a UI component base still being formed:
Example of a website card:

And here's an entire page:
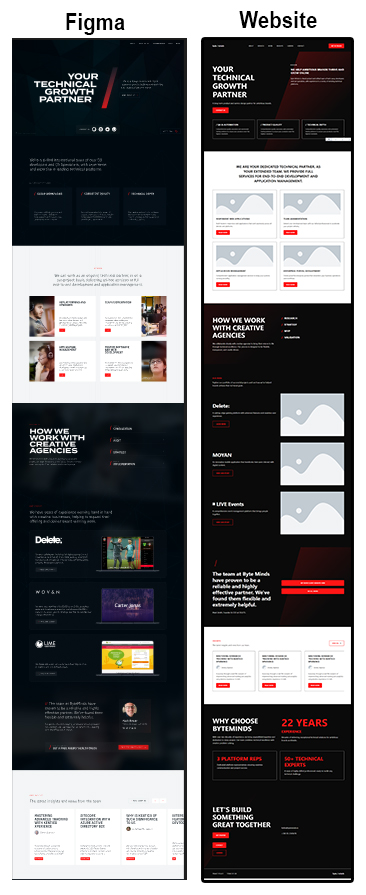
As you can see, AI + MCP handle such tasks as well: it took me about a minute to formulate the request and generate the code. We got a result even with a raw, unconfigured project. However, this is more of a theoretical example. In practical development, this approach isn't justified. Converting an entire page at once creates an extra intermediary layer - code that will inevitably need to be redesigned, parsing and rethinking a large volume of already generated markup.
1. Tokens
You'll notice that executing requests consumes tokens, using up your editor's pricing plan limit. You can't avoid spending tokens altogether. But you can observe the dialogue with the AI to see what extra steps it's taking and then experiment with different models. For example, you can skip linter checks and intermediate code reports in the rules, etc.
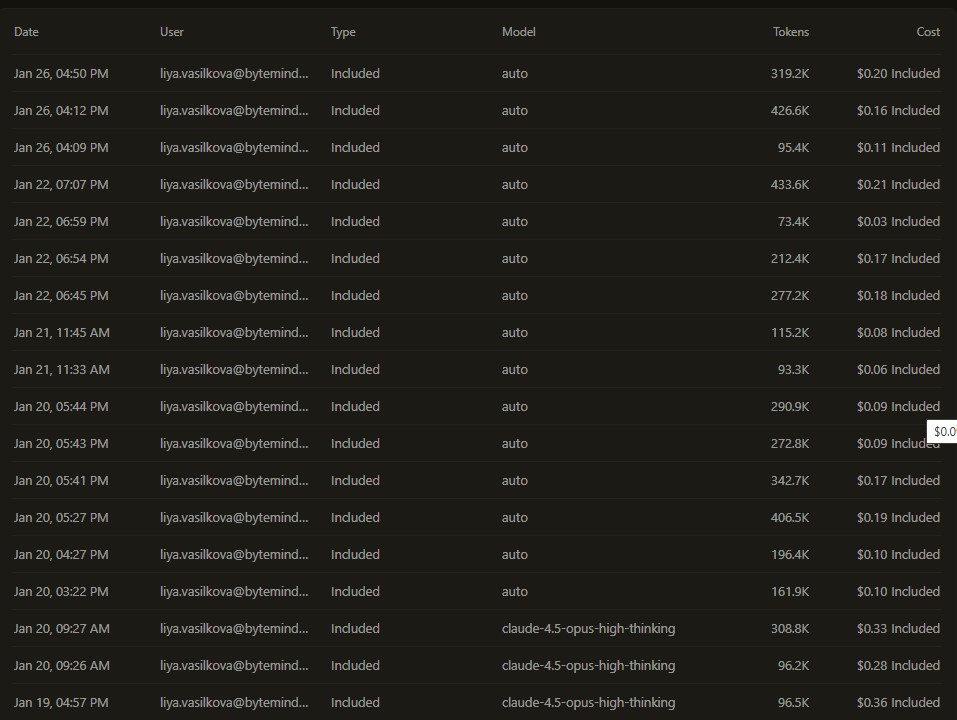
Real examples:
Implementing a card component: 161.9k tokens – $0.10
Implementing a home page (6 sections): 433.6k tokens – $0.21
2. Figma API Limits
After a couple of hours of work on a free plan, you'll likely get a "429 – too many requests" system message. This is a Figma API limitation, not MCP. As explained on Figma's site, this happens because applications and integrations are only allowed to send a certain number of requests to the REST API on your behalf. The limit depends on your pricing plan, license, and file location.
In other words, using MCP on Figma's free plan will only work sporadically, a little, in test mode. Full-fledged work requires access to a paid plan.
3. Dev Mode
For the official Figma MCP, you need Dev Mode - a paid feature. Their site says the remote server is available for all seats and plans, and the desktop server is available for Dev or Full seat on all paid plans. In practice, I only managed to connect to the remote MCP after activating Dev Mode access.
4. Design Requirements
With a messy design, you might get nowhere. Or rather, you might get something, but fixing the errors will take longer than if you did everything manually.
The main recommendations for the design are:
When NOT to Use MCP
I wouldn't use MCP when the design is poor - layers aren't grouped and are chaotic, colors and text styles are scattered and inconsistent, text is split into separate layers. Also, don't waste time converting designs for complex components, components with multi-layered elements and special animations. Or when the volume of work is small and targeted - in this case, it's probably easier to work with components manually.
In this article, we looked at what converting a design into code looks like with AI and MCP. Of course, refining components remains a separate process. The ready code proposed by the AI requires careful review, correction, and in some cases, a complete rewrite. Often, it's easier to just create a component manually from the start than to try to get a result automatically.
And yet, it's impossible to deny that a properly configured MCP and correct interaction with it gives a powerful boost to frontend development. With skillful integration, the effort and time a developer spends on transferring and checking styles can be redirected towards architecture and logic. The main thing is not to rely blindly on the assistant. MCP is just an additional tool that helps speed up work, but the responsibility for code quality remains with the developer.

It's easy to start working with us. Just fill the brief or call us.

Yakov Shevcov
In this article, I want to share not just impressions, but real experience of "surviving" in a commercial project. This is an honest story of what to be prepared for if you're looking for your first job.
Dmitry Berdnikov
In this article, we'll break down two key stages: first, we'll create a repository for email templating, and then we'll configure local test sending via SMTP.
Vasil Khamidullin
This article will help you understand gRPC basics, how it differs from REST, the structure of .proto files, and most importantly- how to test gRPC services using Postman.

Bair Ochirov
In this article, I will briefly answer questions about why the CORS policy was created, how it works, why a simple action like "setting a header on the backend" might not be enough, and what secure patterns to choose for the frontend.
Dmitry Simonov
So, it's been a year since the last article, and a lot has changed. In this one, we're going to talk about integrating with Mock Service Worker (MSW).

Dmitry Bastron
Performance is not a feature to add later, but a core requirement as vital as security. This guide provides a structured approach to building performance into your web services from the start, ensuring they are fast and scalable by design.

Andrey Stepanov
This quick guide helps you define clear objectives and track progress effectively—ensuring every milestone counts.
Andrey Stepanov
A digital product isn’t just about features or design—it’s about teamwork. In this article, we break down the essential roles in digital product development.
Andrey Stepanov
Essential tips for creating a development team that works toward product goals, not just tasks.
Dmitry Bastron
Hi, my name is Dmitry Bastron, and I am the Head of Development at ByteMinds. Today, I’d like to share how I achieved Kentico MVP status, why I chose this CMS, and what it takes to follow the same path and earn the coveted MVP badge.
Maria Serebrovskaya
Hello! My name is Maria, and I am a team lead and backend developer at ByteMinds. In this article, I will share my experience: I’ll explain how to understand a complex project, establish processes, and make it feel like "your own".
Dmitry Simonov
In this article, we’ll take a look at how you can start testing Vue components.
Dmitry Bastron
This article is a cheat sheet to inspect what's going on with the imported data by Xperience by Kentico Migration Toolkit, resolve some CI/CD issues, and on many other occasions!

Anna Bastron
Let's try to understand how the ADM module works, its limitations, and tactics for optimising its performance.
Dmitry Bastron
The more mature Xperience by Kentico products become, the more often I hear "How can we migrate there?”
Andrey Stepanov
In this article, we will touch on where to start designing the architecture and how to make sure that you don’t have to redo it during the process.

Anton Vorotyncev
Today, we will talk about assessing algorithm complexity and clearly demonstrate how this complexity affects the performance of the code.

Tatiana Golovacheva
The development market today feels like a race - each lap is quicker, and one wrong move can cost you. In this race, excellent client service can either add extra points or lead to a loss due to high competition.
Dmitry Bastron
Ensuring security during development is crucial, especially as online and e-commerce services become more complex. To mitigate risks, we train developers in web security basics and regularly perform third-party penetration testing before launch.
Anna Bastron
In my previous article, I shared a comprehensive troubleshooting guide for Sitecore XM Cloud tracking and personalisation. This article visualises what happens behind the scenes when you enable personalisation and tracking in your Sitecore XM Cloud applications.

Sergei Pestov
All the text and examples in this article refer to Next.js 13.4 and newer versions, in which React Server Components have gained stable status and become the recommended approach for developing applications using Next.js.
Anton Vorotyncev
Imagine you have a solution to a problem or a task, and now you need to evaluate the optimality of this solution from a performance perspective.

Artyom Chernenko
Let's talk about how to organize the interaction of microservices in a large, long-lived product, both synchronously and asynchronously.
Dmitry Berdnikov
We suggest using a special editor to immediately check each example while reading the article. This editor is convenient because you can switch the TypeScript version in it.
Anna Gevel
One of the first things I tested in Sitecore XM Cloud was embedded tracking and personalisation capabilities. It has been really interesting to see what is available out-of-the-box, how much flexibility XM Cloud offers to marketing teams, and what is required from developers to set it up.
Dmitry Bastron
We will take you on a journey through a real-life scenario of implementing advanced tracking and analytics using Kentico Xperience 13 DXP.

Anastasia Medvedeva
Kentico stands as one of our principal development tools. We believe it would be fitting to address why we opt to work with Kentico and why we allocate substantial time to cultivating our experts in this DXP.
Anna Gevel
As a software development company, we at Byteminds truly believe that learning and sharing knowledge is one of the best ways of growing technical expertise.
Anastasia Medvedeva
Our expertise spans full-scale builds and support to upgrades and replatforming.
Sergei Pestov
How to stop the decline of the performance indicators of your e-commerce website and perform optimise page load performance.
Dmitry Bastron
We would like to share our experience of integrating Sitecore 9.3 with Azure AD B2C (Azure Active Directory Business to Consumer) user management system.
We'll consider the top-to-bottom approach for modeling content relationships, as it is more user-friendly for content editors working in the Kontent.ai admin interface.
Andrey Stepanov
All you need to know about Headless CMS. We also share knowledge about the benefits of Headless CMS, its pros and cons.
Fedor Kiselev
Let's talk about what enterprise development is, what nuances enterprise projects may have, and which skills you need to acquire to successfully work within the .NET stack.
Andrey Stepanov
We will explain how these agreements differ from one another and what projects they are suitable for.
Anna Gevel
We've collected various findings around decision models and programmable nodes working with Sitecore Personalize.
Anastasia Medvedeva
Our team boasts several developers experienced in working with Umbraco, specialising in development, upgrading, and replatforming from other CMSs to Umbraco.
Anastasia Medvedeva
Since 2015, we've been harnessing Kentico's capabilities well beyond its core CMS functions.
Egor Yaroslavcev
Chrome DevTools serves as a developer console, offering an array of in-browser tools for constructing and debugging websites and applications.
Dmitry Bastron
We'll dive into practical implementation in your Xperience by Kentico project. We'll guide you through setting up a custom activity type and show you how to log visitor activities effectively.